I tried to create a simple, orthogonal and thus easy to extend and adapt testing framework that stays easy to use. I avoided some complexity for users of CUTE by exploiting modern C++ library features in the Boost library that is part of the std::tr1 standard.
Note that all classes presented below are in namespace cute, which is omitted for the sake of brevity.
CUTE Test
The core class stores test functions using std::function. With std::function, any parameterless function or functor can be a test. In addition, each cute::test has a name for easier identification. That name is given either during construction or derived from a functor’s typeid. The GNU g++ compiler requires that you demangle the name given by the type_info object, while VC++ provides a human readable type_info::name() result directly.
As you can see, there is no need to inherit from class test.
For simple functions, or when you want to name your tests differently from the functor’s type, you can use the CUTE() macro:
#define CUTE(name) cute::test((&name),(#name))
CUTE is a function-like macro that takes the name of a test function and instantiates the test class with the address of that test function and its name.
Using a template constructor allows you to use any kind of functor that can be stored in a std::function<void()>, but this means that the functor can take no parameters. To construct with functions, functors or member functions with parameters, use std::bind() as shown below.
Sweet Suites
Running a single test with cute::runner is not very interesting. You might as well just call that function directly and check the results. The power of unit testing is realized when you have a larger collection of test cases that run after every compile and on a build server after every check-in. Thus there is a need for running many tests at once.
In contrast to other unit testing frameworks (including JUnit) I refrained from applying the Composite design pattern [GoF] for implementing the test case container. I love Composite and it is handy in many situations for tree structures, but it comes at the price of strong coupling by inheritance and lower cohesion in the base class, because of the need to support the composite class’ interface. The simplest solution I came up with is to simply represent the test suite as a std::vector<cute::test>. Instead of a hierarchy of suites, you just run a sequence of tests. When the tests run, the hierarchy plays no role. You still can arrange your many tests into separate suites, but before you run them, you either concatenate the vectors or you run the suites individually in your main() function using the runner.
Tests can be added to the suite using vector::push_back(), but to make it really easy to fill your suite with tests, CUTE also provides an overloaded operator+= that will append a test object to a suite:
suites;s+=TestFunctorA{};s+=CUTE(testFunctionB);// and so on ...
If you really want to organize your test as a sequence of test suites, CUTE provides a suite_test functor that will take a test suite and run it through its call operator. However, if any test in a suite_test fails, the remaining tests will not be run.
CUTE’s Eclipse plug-in eases the construction of test suites by providing automatic code generation and adjustment for registering test functions in suites. You can have standalone CUTE executables for a single suite, or test multiple suites, each in a separate library project.
Assertions and Failures
A unit testing framework would not be complete without a way to actually check something in a convenient way. One principle of testing is to fail fast, so any failed test assertion will abort the current test and signal the failure to the top-level runner. You might have already guessed that this is done by throwing an exception. Later on, we will want to know where that test failed, so I introduced an exception class test_failure that takes the source file name and line number in the source file. Java does this automatically for exceptions, but as C++ programmers we must obtain and store this information ourselves. We rely on the preprocessor to actually know where we are in the code. Another std::string allows sending additional information from the test programmer to the debugger of a failing test.
This is how cute_base.h looks without the necessary #include guards and #include <string>:
This is all you need to get started. However, some convenience is popular in testing frameworks. Unfortunately, convenience often tends to be over-engineered and I am not yet sure if the convenience functionality I provided is yet simple enough. Therefore I ask for your feedback on how to make things simpler or confirmation that it is already simple enough.
Testing for Equality
Testing two values for equality is probably the most popular test. Therefore, all testing frameworks provide a means to test for equality. JUnit, for example, provides a complete set of overloaded equality tests. C++ templates can do that as well with less code. For more complex data types, such as strings, it can be difficult to see the difference between two values, when they are simply printed in the error message.
One means to implement ASSERT_EQUAL would be to just #define it to map to ASSERT((expected)==(actual)). However, from my personal experience of C++ unit testing since 1998, this gives too little information when the comparison fails. This is especially true for strings or domain objects, where seeing the two unequal values is often essential for correcting the programming mistake. In my former life, we had custom error messages for a failed string comparison that allowed us to spot the difference easily. Therefore, CUTE provides a template implementation of ASSERT_EQUAL. This is of course called by a macro to enable file position reporting.
I speculated (perhaps wrongly) that it would be useful to specify your own mechanism to create the message if two values differ, which is implemented as a to-be-overloaded interface in the namespace cute::cute_to_string:
namespacecute_to_string{template<typenameT>std::stringto_string(Tconst&t){std::ostringstreamos;to_stream(os,t);returnos.str();}// common overloads of interface that work without an ostreamstaticinlinestd::stringto_string(charconst*const&s){returns;}staticinlinestd::stringto_string(std::stringconst&s){returns;}}
Your overloaded to_string function is then called in diff_values which composes the standard message for your failed test case…
template<typenameExpectedValue,typenameActualValue>std::stringdiff_values(ExpectedValueconst&expected,ActualValueconst&actual,charconst*left="expected",charconst*right="but was"){// construct a simple message...to be parsed by IDE supportstd::stringres;res+=' ';res+=left;res+=":\t"+cute_to_string::backslashQuoteTabNewline(cute_to_string::to_string(expected))+'\t';res+=right;res+=":\t"+cute_to_string::backslashQuoteTabNewline(cute_to_string::to_string(actual))+'\t';returnres;}
…and which is called in case your ASSERT throws a test_failure.
As of version 1.5, CUTE allows all kinds of types to be compared by ASSERT_EQUAL. While earlier versions allowed only types where operator<<(ostream &,TYPE) was defined, some template meta-programming tricks now allow also other types, as long as operator==(expected,actual) is defined and delivers a bool compatible result. For integer types, meta-programming ensures that no signed-unsigned comparison warning is issued anymore. Comparing two floating point values without specifying a delta, automatically selects a delta that masks the least significant decimal digit, based on the size of expected. Floating point comparison subtracts actual and expected and sees if the absolute value of the difference is less than delta, by using std::abs().
Exception Testing
Another good unit testing practice is to verify that things go wrong as intended.
To embed a piece of code (an expression, or anyhting that can be passed as a macro parameter) that should throw a specific exception type, you can use the macro…
This test will fail if should_throw_std_exception() does not throw an exception of type std::exception. Any other exception will lead to an error, in contrast to failure.
There is no need to implement the try-catch again by hand to test error conditions. What is missing is the ability to expect a runtime error recognized by the operating system such as an invalid memory access. Those are usually signaled instead of thrown as a nice C++ exception.
You might need parenthesis around the code in the macro parameter to disambiguate commas, particularly commas in a parameter list.
Listening Customization
You have already seen that the runner class template can be specialized by providing a listener. The runner class is an inverted application of the Template Method design pattern [GoF]. Instead of implementing the methods called dynamically in a subclass, you provide a template parameter that acts as a base class to the class @runner@, which holds the template methods runit() and operator().
If you look back to runner::runit(), you will recognize that if any reasonable exception is thrown, it would be hard to diagnose the reason for the error. Therefore, I included catch clauses for std::exception, string and char pointers to get information required for diagnosis. The demangling is required for GNU g++ to get a human-readable information from the exception’s class name.
Again I ask you for feedback if doing this seems over-engineered. Are you throwing strings as error indicators?
As you can see, there are a bunch of methods delegated to the base class given as runner’s template parameter (begin, end, start, success, failure, error). The default template parameter null_listener applies the Null Object design pattern and provides the concept all fitting Listener base classes.
structnull_listener{// defines Contract of runner parametervoidbegin(suiteconst&,charconst*/*info*/,size_t/*n_of_tests*/){}voidend(suiteconst&,charconst*/*info*/){}voidstart(testconst&){}voidsuccess(testconst&,charconst*/*msg*/){}voidfailure(testconst&,test_failureconst&){}voiderror(testconst&,charconst*/*what*/){}};
Whenever you need to collect the test results or you want to have a nice GUI showing progress with the tests, you can create your own custom listener.
Again you can stack listeners using an inverted version of a Decorator design pattern [GoF]. Here is an example of an inverted Decorator using C++ templates that counts the number of tests by category:
From the above schema, you can derive your own stackable listener classes, such as a listener that displays in a GUI the progress and results of tests as they run. If you do so, please share your solution.
Member Functions as Tests
With std::bind() at your disposal, it is easy to construct a functor object from a class and its member function. Again this is canned in a macro that can be used like this:
The first version uses object testobject, an instance of TestClass, as the target for the member function test1. The second version creates a new instance of TestClass to then call its member function test2 when the test is executed. The last macro provides a means to pass an additional object to TestClass’ constructor when it is incarnated. The idea of incarnating the test object and thus have its constructor and destructor run as part of the test comes from Kevlin Henney and is implemented in Paul Grenyer’s testing framework Aeryn.
The macro CUTE_MEMFUN delegates its work to a template function as follows:
When the template function makeMemberFunctionTest is called, it employs std::bind to create a functor object that will call the member function fun on object t. Again we can employ C++ reflection using typeid to derive part of the test object’s name. We need to derive the member function name again using the preprocessor with a macro. In order to also allow const member functions, the template function comes in two overloads, one using a reference (as shown) and the other using a const reference for the testing object.
Test Object Incarnation
I will spare you the details, and just present the mechanism of object incarnation and then calling a member function for the case where you can supply a context object:
This allows you to use test classes with a constructor to set up a test fixture and a destructor for cleaning up after the test. This eliminates need to for explicit setUp() and tearDown() methods, as in JUnit.
Example
structTestClass{staticintcallcounter;inti;TestClass():i(1){}// for incarnation; setUpTestClass(intj):i(j){}// for incarnation; setUp~TestClass(){...}// for destruction; tearDownvoidtest1(){++callcounter;ASSERT_EQUAL(1,i++);}voidtest2()const{++callcounter;ASSERT(true);}voidtest3(){++callcounter;ASSERT_EQUAL(2,i++);++i;}voidtest_incarnate(){++callcounter;ASSERT_EQUAL(42,i++);}voidtest_incarnate_const()const{++callcounter;ASSERT_EQUAL(43,i);}};....cute::suites3;s3+=CUTE_SMEMFUN(TestClass,test1);s3+=CUTE_SMEMFUN(TestClass,test2);TestClasscontext{2};s+=CUTE_CONTEXT_MEMFUN(context,TestClass,test3);
The CUTE Eclipse plug-in integrates the CUTE C++ unit testing framework into the Eclipse CDT C/C++ integrated development environment. This plug-in provides all the important features that Java developers know from the JUnit plug-in:
Wizards to initialize and set up new tests
Test navigator with green/red bar
Diff-viewer for failing tests
Rerun functionality for single test (e.g. a failed one)
This page shows how to use the CUTE Eclipse plug-in once it is installed.
Functionality
Create a Project
Select File > New > C++ Project. In the C++ Project dialog, the CUTE Eclipse plug-in provides two new C++ project wizards in addition to those that come with CDT by default:
Select the type of CUTE project you want:
CUTE Project creates a standalone test project.
CUTE Suite Project asks you for a name, and creates a test suite with that name.
Specify the Project name and click Next >. On the following wizard page, you can choose which CUTE headers to use (recommended are the newest ones) and if you want to use Gcov and/or CUTE’s boost-headers (if one of these optional CUTE features was installed). If you specify an existing Eclipse project you want to test, CUTE creates a unit test for that project. Upon clicking Finish, the wizard creates a project containing all the CUTE unit test framework’s source files.
From within the CUTE Tests view you can select tests or suites from the tree and let these run individually. If the view was populated from a “Debug as CUTE Test” the re-run will be within the debugger as well.
XML Output
The CUTE framework can generate XML output. While this doesn’t directly link with the CUTE framework, you can click on the generated XML file in the project’s root folder from within CDT and might get Eclipse’s JUnit View if you have installed JDT as well. The XML output might be interesting for you when using hudson or jenkins.
Specify Boost’s Headers Installation Location
Right click on the newly created CUTE project and select Properties. Under C/C++ General->Preprocessor Include Paths, Macros etc., choose CDT User Setting Entries. Click Add… and specify the installation location of the boost headers.
TDD Support
The CUTE plug-in supports the user in creating and running unit tests for C++. Additionally, it provides decent support for Test Driven Development. When following Test Driven Development, the unit tests are written before the implementation. While writing the test cases, much semantic and syntactic information about the tested entities is specified. The CUTE plug-in coding assist supports the developer by generating the stubs as a framework for implementing the functionality.
Features
Creating Class Types
Creating Constructors
Creating (Member) Variables
Creating (Member) Functions
Creating (Member) Operators
Visibility Manipulation
Adapting Parameter Lists
Creating Namespaces
TDD Tutorial
Let us have a look at the TDD feature. We will introduce its functionality with a step-by-step example. Our objective is to develop a simple calculator.
CUTE Project
Create a CUTE Project in CDT.
Note: After creating the project there might be several markers indicating problems in Test.cpp. They will vanish as soon as CDT has finished indexing the symbols of that file.
Generating a Type
First we want to create a Calculator class. We will stick with the mental model of a pocket calculator, always displaying the current value. A member function named value shall return it. The initial value in the calculator is 0. This composes our first unit test:
As there is already an example test case after creating a new CUTE Project, we can recycle this test by renaming it (Alt+Shift+R when the caret is at the test function name). Then we replace the code in the body with our test code.
An error marker appears at the line containing Calculator. Hovering the mouse cursor over the marker on the left or over the identifier Calculator reveals the problem: Type ‘Calculator’ cannot be resolved, indicating that at the current position the type Calculator is not known.
By clicking this marker or by pressing Ctrl+1, a so called resolution appears:
Selecting this resolution creates an empty type definition for Calculator. The kind of type can directly be specified from a list containing struct (which is default), class and enum.
Generating this empty type stub removed the marker at Calculator. But another marker appeared at the statement calc.value() as the type Calculator does not contain a member function value.
Again, by clicking the marker and selecting the resolution Create member function value, a stub for the corresponding function is generated in the type Calculator.
structCalculator{intvalue()const{returnint();}};
Compiling and running the test works now. It even yields a green bar.
Moving the Type
We do not want to have the tested code in the same source files as the test code. Thus we move our implementation of Calculator to its own file.
To achieve this, you have to select the type definition and invoke the Extract to new header file refactoring (Alt+Shift+P).
This extracts the type definition Calculator to its own header file.
An include directive is added to Test.cpp to retain accessibility of Calculator in the test.
Toggling Function Definition
In the new header file we can toggle the definition of @value@ out of the type. Use Toggle Function Definition (Alt+Shift+T) to separate the definition from the declaration of the selected member function.
If desired, the Toggle Function refactoring can be invoked again, which moves the definition of value to the source file Calculator.cpp. If that file does not exist, it is created.
To have a proper separation of test and implementation projects, you need to move the files specifying the Calculator type to their own project. Currently, this is not supported by a refactoring we know. Thus we will skip this and stick with one single project.
Generating a Constructor
Now we extend our @Calculator@ type to be constructible with a specific value. To do so we create another test case in @Test.cpp@:
The new constructor does not do much. We can add a member variable to the initializer list to store the starting value. Of course we do not need to declare it manually. We just add the initialization and receive another marker:
The following resolution creates the declaration of the member variable in the private section:
If we now change value() to return the val member variable we almost have two green-bar unit tests.
Generating a Default Constructor
In Test.cpp we see another error marker in the first test function. Through the declaration of the new explicit constructor we have removed the implicit default constructor. Our plug-in recognizes that and suggests to create another constructor:
With this resolution we can add a default constructor with one click. We just need to add the initialization of val by hand.
Adding a Test Case to the Suite
There is also a warning marker indicating that we have not yet added this new test case to our test suite in Test.cpp at testSpecifiedStartValue. The plug-in can handle this too:
The resolution adds the test function testSpecifiedStartValue to our test suite s:
Now compiling and running our unit tests results in a green bar for both tests.
Other Cases
The steps described are examples of the capabilities of our plug-in’s TDD features. It can also recognize for example missing operators, local variables and free functions.
Limitations
As it is very complex to provide sensible code stubs for C++ just from the context where an entity is used, it takes quite some effort to achieve flawless code generation. Therefore, feedback is greatly appreciated.
Information about symbols, which is required for reporting errors and providing resolutions, heavily depends on the CDT index to be built completely.
Writing and Running CUTE Unit Test Suites
Here you will learn how to create and run tests for your code using the CUTE C++ unit testing framework. We begin with the initial trivial test src/Test.cpp that is created by the Using the CUTE Eclipse Plug-in.
Source File Organization
Before you start writing tests, you need a plan for organizing your source files.
Single File
If your test is short enough to fit into one file, then you can simply add it to the trivial source file src/Test.cpp provided by CUTE:
#include "cute.h"
#include "ide_listener.h"
#include "xml_listener.h"
#include "cute_runner.h"
// TODO #include the headers for the code you want to test// TODO Add your test functionsvoidthisIsATest(){ASSERTM("start writing tests",false);}boolrunAllTests(intargc,charconst*argv[]){cute::suites{};//TODO add your test heres.push_back(CUTE(thisIsATest));cute::xml_file_openerxmlfile(argc,argv);cute::xml_listener<cute::ide_listener<>>lis(xmlfile.out);autorunner=cute::makeRunner(lis,argc,argv);boolsuccess=runner(s,"AllTests");returnsuccess;}intmain(intargc,charconst*argv[]){returnrunAllTests(argc,argv)?EXIT_SUCCESS:EXIT_FAILURE;}
Edit this file:
#include the header files for the classes you are testing.
Replace function thisIsATest() with your test functions.
Replace thisIsATest in s.push_back(CUTE(thisIsATest)) with your test functions.
Partitioning Into Multiple Files
Chances are, you will want to partition your tests into multiple files. Generally, it is best to have one test suite for each source file in the project that you are unit testing. The test suite consists of a header (.h) file and an implementation (.cpp) file. Name them consistently. For example, put class myclass in files myclass.cpp and myclass.h, and put the unit test for myclass in myclassTest.cpp and myclassTest.h.
Writing Tests
Code Your Tests Using CUTE Assertions
The test consists of a series of lines that set up some situation to be checked, followed by a CUTE assertion to perform the check.
In your test implementation file (myclassTest.cpp in the above example), include the file that defines the CUTE assertions:
#include "cute.h"
The header cute.h provides a variety of macros you can use to verify conditions. Most assertions have two versions: one version uses the source code of the test itself as the message, and the other allows you to specify your own message msg.
ASSERTM(msg, cond)
ASSERT(cond)
If cond is false, the test fails.
FAILM(msg)
FAIL()
Fail unconditionally. The message “@FAIL()@” is used if no message is specified.
ASSERT_EQUALM(msg, expected, actual)
ASSERT_EQUAL(expected, actual)
If expected and actual are not equal, fail and print the values of expected and actual. Specify an unsigned constant when comparing to unsigned value. For example,
ASSERT_EQUAL(5u,vect.size());
Take care to specify the expected value followed by the actual value, as shown above. If you reverse them, they appear backwards in the failure message.
ASSERT_NOT_EQUAL_TOM(msg, left, right)
ASSERT_NOT_EQUAL_TO(left, right)
Fail if left and right are equals.
ASSERT_EQUAL_DELTAM(msg, expected, actual, delta)
ASSERT_EQUAL_DELTA(expected, actual, delta)
Fail if expected and actual are different by more than delta. Use this assertion for real numbers.
Fail if left is greater/greater equals/lesser/lesser equals than right.
ASSERT*_DDTM(msg, cond, failure)
ASSERT*_DDT(cond, failure)
All the above macros are available with DDT in the macro name. Use these macros to do data driven testing.
Put these assertions in the test implementation file (myclassTest.cpp in the above example).
Collect the Tests In a Test Suite
A CUTE test suite is a vector of tests. The tests are executed in the order in which they were appended to the suite. If an assertion in some test fails, the failure is reported, and the rest of the test is skipped. Execution continues with the next test in the suite. This means that a suite of many short tests is better than a few long tests:
With shorter tests, less test code is skipped upon a failure.
Each test can fail at most once, so a suite with more tests will show more failures to help you pinpoint bugs.
In the trivial source file provided with CUTE src/Test.cpp, include the test header file for your test. For example,
#include "myclassTest.h"
When the Test Is a Simple Function
If you prefer to write your tests as simple functions, implement the test function, and push it on the test suite using the CUTE() macro:
s.push_back(CUTE(mytestfunction));
When the Test Is a Functor
If you prefer to implement your test as a class or struct, define a functor class in a header file, say myclassTest.h:
// File myclassTest.hclassmyclassTest{public:myclassTest();// Must define void operator() with no arguments.// In implementation: add calls to cute-assert functions and methods like someFunction1voidoperator()();private:// Whatever methods you needvoidsomeFunction1();voidsomeFunction2();// Whatever member variables you needintmemberVar1;intmemberVar2;};
Put the implementation of @mytestClass@ in a separate file, like myclassTest.cpp.
Returning to the test suite code (src/Test.cpp), include the test class header file and add the test functor to the test suite:
#include "cute.h"
#include "ide_listener.h"
#include "xml_listener.h"
#include "cute_runner.h"
// TODO #include the headers for the code you want to test#include "myclassTest.h"
#include "anotherclassTest.h"
boolrunAllTests(intargc,charconst*argv[]){cute::suites{};//TODO add your test heres.push_back(myclassTest{});s.push_back(anotherclassTest{});cute::xml_file_openerxmlfile(argc,argv);cute::xml_listener<cute::ide_listener<>>lis(xmlfile.out);autorunner=cute::makeRunner(lis,argc,argv);boolsuccess=runner(s,"AllTests");returnsuccess;}intmain(intargc,charconst*argv[]){returnrunAllTests(argc,argv)?EXIT_SUCCESS:EXIT_FAILURE;}
Running the CUTE Test
Compile and execute the test. The tests will be executed in the order in which they were appended to the suite. If an assertion fails, it is reported through the listener, and the test containing the failed assertion is aborted. Execution continues with the next test in the suite.
Adding New Test Functions
Of course you can just add new test functions by hand and and also add them to the test suite that way. CUTE also offers code generators to make these tasks faster and easier.
To add a new test function, place your cursor at the location where the new function should be inserted:
Right-click and select Source > New Test Function.
At this point, you can give the new test function a unique name. Note that the test function has automatically been registered in the test suite.
Adding Test Functions to a Suite
If you write a new test function by hand, you can automatically add it to the test suite as described in the following.
Your test function (a function is only considered a test function if it contains at least one ASSERT*-statement) will automatically be annotated by a marker and yellow underlined as shown in the following image.
Click the marker (or press Ctrl+1 when the caret is on the given line) and choose “Add test to suite”.
Using Structs and Classes as Tests
A functor here is defined as: any class or struct with a public operator() that takes zero arguments.
Place your cursor anywhere along the desired function. Right click Source > Add Test > Add Test functor to Suite.
#include "cute.h"
#include "ide_listener.h"
#include "xml_listener.h"
#include "cute_runner.h"
structStructTest{voidoperator()(){ASSERTM("Failing test",false);}};structWithConstructor{WithConstructor(intx):x{x}{}intx;voidoperator()(){ASSERT_EQUALM("x should be 5",5,x);}};boolrunAllTests(intargc,charconst*argv[]){cute::suites{};s.push_back(StructTest());s.push_back(WithConstructor(4));s.push_back(WithConstructor(5));cute::xml_file_openerxmlfile(argc,argv);cute::xml_listener<cute::ide_listener<>>lis(xmlfile.out);autorunner=cute::makeRunner(lis,argc,argv);boolsuccess=runner(s,"AllTests");returnsuccess;}intmain(intargc,charconst*argv[]){returnrunAllTests(argc,argv)?EXIT_SUCCESS:EXIT_FAILURE;}
Adding Test Member to Suite
A test method in a class or struct can be added. See the code bellow as example.
A class or struct method needs to be public, non static, parameterless, non union. The class needs to be default constructible. An instance method needs to be public, non static, parameterless, non union and its return type needs to be void.
#include "cute.h"
#include "ide_listener.h"
#include "xml_listener.h"
#include "cute_runner.h"
structMemberTest{boolaTest(){ASSERT(false);}};structWithConstructor{WithConstructor(intx):x{x}{}intx;voidoperator()(){ASSERT_EQUALM("x should be 5",5,x);}voidtest10(){ASSERT_EQUALM("x should be 10",10,x);}};boolrunAllTests(intargc,charconst*argv[]){cute::suites{};s.push_back(CUTE_SMEMFUN(MemberTest,aTest));s.push_back(WithConstructor(5));WithConstructorinstance{5};s.push_back(CUTE_MEMFUN(instance,WithConstructor,operator()));//same as aboves.push_back(CUTE_MEMFUN(instance,WithConstructor,test10));cute::xml_file_openerxmlfile(argc,argv);cute::xml_listener<cute::ide_listener<>>lis(xmlfile.out);autorunner=cute::makeRunner(lis,argc,argv);boolsuccess=runner(s,"AllTests");returnsuccess;}intmain(intargc,charconst*argv[]){returnrunAllTests(argc,argv)?EXIT_SUCCESS:EXIT_FAILURE;}
Creating a Library Test Project
First, create a shared or static library project. Ensure that the library project is opened, else it wouldn’t be shown in the following steps. Next create a CUTE Test Project. To do this select File->New->C++ Project, then expand CUTE and select CUTE Project. Give your project a name and press _Next >.
Check the checkbox Add Library Dependency. Then select the desired library project you would like to test.
Press Next > or Finish to complete the wizard.
Under Project > Properties > C/C++ Build > Settings, one of the following compiler -I and Linker -l -L settings will be set. Subsequent changes can be managed by the user.
Creating a Suite Project
A CUTE project with a custom test suite name can be created easily with the CUTE Suite Project wizard. To do this, select File > New > C++ Project. Then, expand CUTE, select CUTE Suite Project and give your project a name.
Click Next > and specify a suite name.
A project with the structure shown below will be created.
Add tests that belong to the newly created suite in <your_suite_name>.cpp.
Adding New Suite Modules
Right-click on a project, folder or file (.cpp or .h) and choose New > CUTE Suite File.
Enter the name of your new suite and click Finish.
Now you need to have your runner also integrate the cute::suite that is returned by the make_suite_<your_suite_name>() function in <your_suite_name>.h.
The initial Test.cpp (or the file that contains your cute::makeRunner(...) call) should look similar to this:
Unwanted dependencies are a critical problem in software development. We often have to break existing dependencies before we can change some piece of code. Breaking existing dependencies is also an important preliminary to introduce unit tests for legacy code — according to Feathers definition code without unit tests.
Feathers’ seams help in reasoning about the opportunities that exist when we have to break dependencies. The goal is to have a place where we can alter the behaviour of a program without modifying it in that place. This is important because editing the source code is often not an option (e. g., when a function the code depends on is provided by a system library).
What is a Seam?
Feathers characterises a seam as a place in our code base where we can alter behaviour without being forced to edit it in that place. This has the advantage that we can inject the dependencies from outside, which leads to both an improved design and better testability. Every seam has one important property: an enabling point. This is the place where we can choose between one behaviour or another. There are different kinds of seam types.
What Kinds of Seams Does C++ Provide?
C++ offers a wide variety of language mechanisms to create seams. Beside the classic way of using subtype polymorphism which relies on inheritance, C++ also provides static polymorphism through template parameters. With the help of the preprocessor or the linker we have additional ways of creating seams.
Screencast Introduction to Seams
Object Seam
Object seams are probably the most common seam type. To start with an example, consider the following code where the class GameFourWins has a hard coded dependency to Die:
According to Feathers definition, the call to play is not a seam because it is missing an enabling point. We cannot alter the behaviour of the member function play without changing its function body because the used member variable die is based on the concrete class Die. Furthermore, we cannot subclass GameFourWins and override play because play is monomorphic (not virtual).
This fixed dependency also makes GameFourWinshard to test in isolation because Die uses C’s standard library pseudo-random number generator function rand. Although rand is a deterministic function since calls to it will return the same sequence of numbers for any given seed, it is hard and cumbersome to setup a specific seed for our purposes. The classic way to alter the behaviour of GameFourWins is to inject the dependency from outside. The injected class inherits from a base class, thus enabling subtype polymorphism. To achieve that, Mockator provides a refactoring called Extract Interface and creates the following code:
structIDie{virtual~IDie(){}virtualintroll()const=0;};structDie:IDie{introll()const{returnrand()%6+1;}};structGameFourWins{GameFourWins(IDie&die):die(die){}voidplay(std::ostream&os=std::cout){// as before}private:IDie¨};
This way we can now inject a different kind of Die depending on the context we need. This is a seam because we now have an enabling point: The instance of Die that is passed to the constructor of GameFourWins.
Object Seams Screencast
Compile Seam
Although object seams are the classic way of injecting dependencies, we think there is often a better solution to achieve the same goals. C++ has a tool for this job providing static polymorphism: template parameters. With template parameters, we can inject dependencies at compile-time. We therefore call this seam compile seam.
The essential step for this seam type is the application of a the refactoring extract template parameter. The result of this refactoring can be seen here:
template<typenameDice=Die>structGameFourWinsT{voidplay(std::ostream&os=std::cout){if(die.roll()==4){os<<"You won !"<<std::endl;}else{os<<"You lost !"<<std::endl;}}private:Dicedie;};typedefGameFourWinsT<>GameFourWins;
The enabling point of this seam is the place where the template class GameFourWinsT is instantiated.
The use of static polymorphism with template parameters has several advantages over object seams with subtype polymorphism. It does not incur the run-time overhead of calling virtual member functions that can be unacceptable for certain systems. Probably the most important advantage of using templates is that a template argument only needs to define the members that are actually used by the instantiation of the template (providing compile-time duck typing). This can ease the burden of an otherwise wide interface that one might need to implement in case of an object seam.
Compile Seams Screencast
Preprocessor Seam
C and C++ offer another possibility to alter the behaviour of code without touching it in that place using the preprocessor. Although we are able to change the behaviour of existing code as shown with object and compile seams before, we think preprocessor seams are especially useful for debugging purposes like tracing function calls. An example of this is shown next where we trace calls to C’s malloc function with the help of Mockator:
The enabling point for this seam are the options of our compiler to choose between the real and our tracing implementation. We use the option -include of the GNU compiler here to include the header file malloc.h into every translation unit. With #undef we are still able to call the original implementation of malloc.
Preprocessor Seams Screencast
Link Seams
Beside the separate preprocessing step that occurs before compilation, we also have a post-compilation step called linking in C and C++ that is used to combine the results the compiler has emitted. The linker gives us another kind of seam called link seam. We show three kinds of link seams here:
Shadowing functions through linking order (override functions in libraries with new definitions in object files)
Wrapping functions with GNU’s linker option -wrap (GNU Linux only)
Run-time function interception with the preload functionality of the dynamic linker for shared libraries (GNU Linux and Mac OS X only)
Link Seams Screencast
Shadow Functions Through Linking Order
In this type of link seam we make use of the linking order. The linker incorporates any undefined symbols from libraries which have not been defined in the given object files. If we pass the object files first before the libraries with the functions we want to replace, the GNU linker prefers them over those provided by the libraries. Note that this would not work if we placed the library before the object files. In this case, the linker would take the symbol from the library and yield a duplicate definition error when considering the object file. Mockator helps in shadowing functions and generates code and the necessary CDT build options to support this kind of link seam:
$ ar -r libGame.a Die.o GameFourWins.o
$ g++ -Ldir/to/GameLib -o Test test.o shadow_roll.o -lGame
The order given to the linker is exactly as we need it to prefer the symbol in the object file since the library comes at the end of the list. This list is the enabling point of this kind of link seam. If we leave shadow_roll.o out, the original version of roll is called as defined in the static library libGame.a. This type of link seam has one big disadvantage: it is not possible to call the original function anymore. This would be valuable if we just want to wrap the call for logging or analysis purposes or do something additional with the result of the function call.
Wrapping Functions With GNU’s Linker
The GNU linker ld provides a lesser-known feature which helps us to call the original function. This feature is available as a command line option called wrap. The man page of ld describes its functionality as follows: “Use a wrapper function for symbol. Any undefined reference to symbol will be resolved to __wrap_symbol. Any undefined reference to __real_symbol will be resolved to symbol.”
As an example, we compile GameFourWins.cpp. If we study the symbols of the object file, we see that the call to Die::roll — mangled as _ZNK3Die4rollEv according to Itanium’s Application Binary Interface (ABI) that is used by GCC v4.x — is undefined (nm yields U for undefined symbols).
$ gcc -c GameFourWins.cpp -o GameFourWins.o
$ nm GameFourWins.o | grep roll
U _ZNK3Die4rollEv
This satisfies the condition of an undefined reference to a symbol. Thus we can apply a wrapper function here. Note that this would not be true if the definition of the function Die::roll would be in the same translation unit as its calling origin. If we now define a function according to the specified naming schema __wrap_symbol and use the linker flag -wrap, our function gets called instead of the original one. Mockator helps in applying this seam type by creating the following code and the corresponding build options in Eclipse CDT:
extern"C"{externint__real__ZNK3Die4rollEv();int__wrap__ZNK3Die4rollEv(){// your intercepting functionality herereturn__real__ZNK3Die4rollEv();}}
$ g++ -Xlinker-wrap=_ZNK3Die4rollEv -o Test test.o GameFourWins.o Die.o
To prevent the compiler from mangling the mangled name again, we need to define it in a C code block. Note that we also have to declare the function __real_symbol which we delegate to in order to satisfy the compiler. The linker will resolve this symbol to the original implementation of Die::roll.
Alas, this feature is only available with the GNU tool chain on Linux. GCC for Mac OS X does not offer the linker flag -wrap. A further constraint is that it does not work with inline functions but this is the case with all link seams presented here. Additionally, when the function to be wrapped is part of a shared library, we cannot use this option.
Run-time Function Interception
If we have to intercept functions from shared libraries, we can use this kind of link seam. It is based on the fact that it is possible to alter the run-time linking behaviour of the loader ld.so in a way that it considers libraries that would otherwise not be loaded. This can be accomplished by the environment variable LD_PRELOAD that the loader ld.so interprets.
With this we can instruct the loader to prefer our function instead of the ones provided by libraries normally resolved through the environment variable LD_LIBRARY_PATH or the system library directories. As an example, consider the following code and the CDT build options which is generated by Mockator to intercept function calls to Die::roll:
The advantage of this solution compared to the first two link seams is that it does not require re-linking. It is solely based on altering the behaviour of ld.so. A disadvantage is that this mechanism is unreliable with member functions, because the member function pointer is not expected to have the same size as a void pointer.
Using Test Doubles
Although there are already various existing mock object libraries for C++, we believe that creating mock objects is still too complicated and time-consuming for developers. Mockator provides a mock object library and an Eclipse plug-in to create mock objects in a simple yet powerful way. Mockator leverages the new language facilities C++11 offers while still being compatible with C++98/03.
Features include:
Mock classes and functions with sophisticated IDE support
Easy conversion from fake to mock objects that collect call traces
Convenient specification of expected calls with C++11 initializer lists or with Boost assign including Eclipse linked edit mode support
Support for regular expressions to match calls with expectations
SCons is an open source software build tool which tries to fix the numerous weaknesses of make and its derivatives. For example, the missing automatic dependency extraction, make’s complex syntax to describe build properties and cross-platform issues when using shell commands and scripts. SCons is a self-contained tool which is independent of existing platform utilities. Because it is based on Python, a SCons user has the full power of a programming language to deal with all build related issues.
It was long past time for autotools to be replaced, and SCons has won the race to become my build system of choice. Unified builds and extensibility with Python — how can you beat that?
Eric S. Raymond, author of The Cathedral and the Bazaar
Use SConsolidator to build your projects in Eclipse
Maintaining a SCons-based C/C++ project with Eclipse CDT meant that all the intelligence SCons puts into your project dependencies had to be re-entered into Eclipse CDT’s project settings, so that its indexer and parser would be able to know your code’s compile settings and enable many of its features. In addition, SCons’ intelligence comes at the price of relatively long build start-up times - when it (re-) analyses the project dependencies - which can become annoying when you just fix a simple syntax error.
SConsolidator addresses these issues and provides tool integration for SCons in Eclipse for a convenient development experience.
Main Features
Conversion of existing C++ CDT managed build projects to SCons projects
Import of existing SCons projects into Eclipse with wizard support
Interactive mode to quickly build single C/C++ source files speeding up round-trip times
A special view for a convenient build target management of all workspace projects
Graph visualization of build dependencies that helps in debugging SCons build issues
Works out of the box
SConsolidator has been successfully used to import the following SCons-based projects into Eclipse:
To use SConsolidator, you first have to install SCons (version 2.0 is the minimum requirement). SConsolidator requires at least a Eclipse Indigo release of the CDT, otherwise you won’t be able to install SConsolidator. Execute the following steps to install it in Eclipse:
Choose the menu Help, Install New Software…
Type the URL of the SConsolidator update site into the site field: http://www.sconsolidator.com/update
Then, you can either only install SConsolidator’s base functionality by choosing the feature SConsolidator - Base or additionally SConsolidator - Dependency Visualization for visualizing build target dependencies (the latter needs GEF and Zest to be installed).
After the installation, Eclipse will ask to restart itself. Please do this.
Getting Started
Add SCons support to an existing project
To add SCons support to an existing C/C++ project, just right click on the project(s) in the project explorer and choose one of the following two submenus of SCons:
Use self-provided SCons build (aka “existing mode”) for projects where you provide the SCons build files
Use generated SCons build (aka “managed mode”) for projects where SConsolidator should create and update the SCons build files
Notice that you should use managed for simple C/C++ projects only. It can be considered as a good starting point if you are not yet familiar with SCons. As soon as your projects grow in size and complexity, you want to use your own provided SCons build files.
For non-C/C++ projects, you only have one menu named Add SCons support.
Building projects with SCons
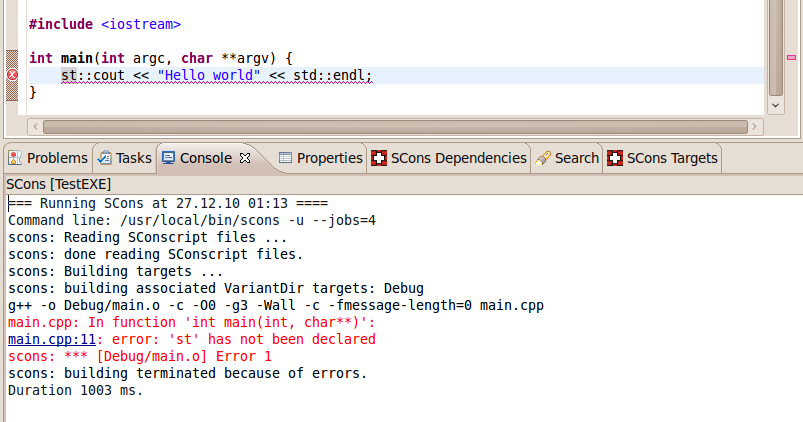
If you request a build, the output of a SCons build run is shown in a project specific console. Compile errors are shown in red and hyperlinks are provided to directly jump to the location in the editor where the error was found by the compiler. Error markers are created for the compiler errors as we are used from Eclipse.
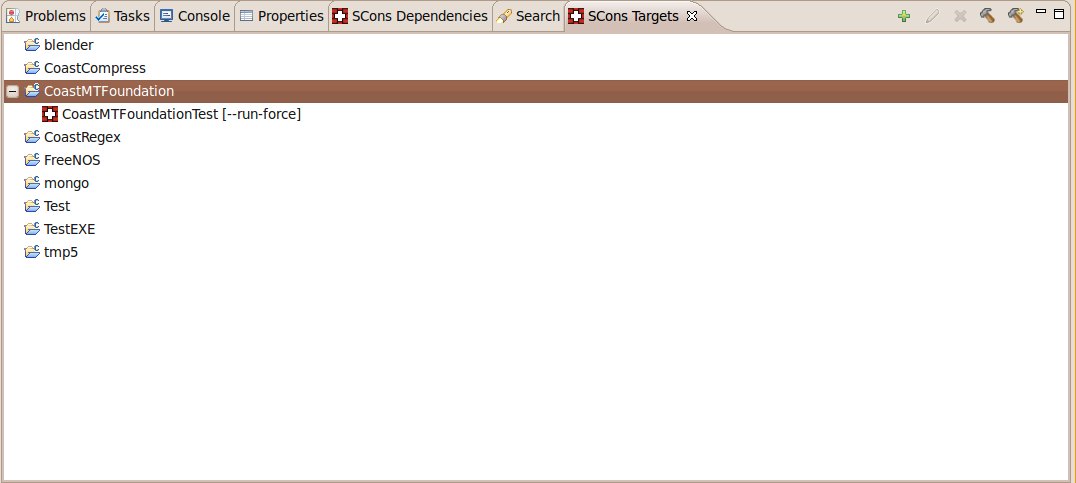
Target View
SCons target view shows all the SCons projects in the current workspace and allows you to maintain the targets on a project level. To request a build for a specific target, you have to select it in the view and click the build button in the upper right corner. The same can be achieved for a build in the interactive console.
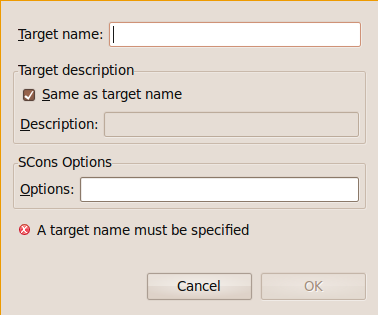
There is a dialog to create a new target for a SCons project. There you can define the name of the target and additional SCons options which will be used when SCons is invoked. Furthermore, you can also specify a target alias which is also shown in the target view.
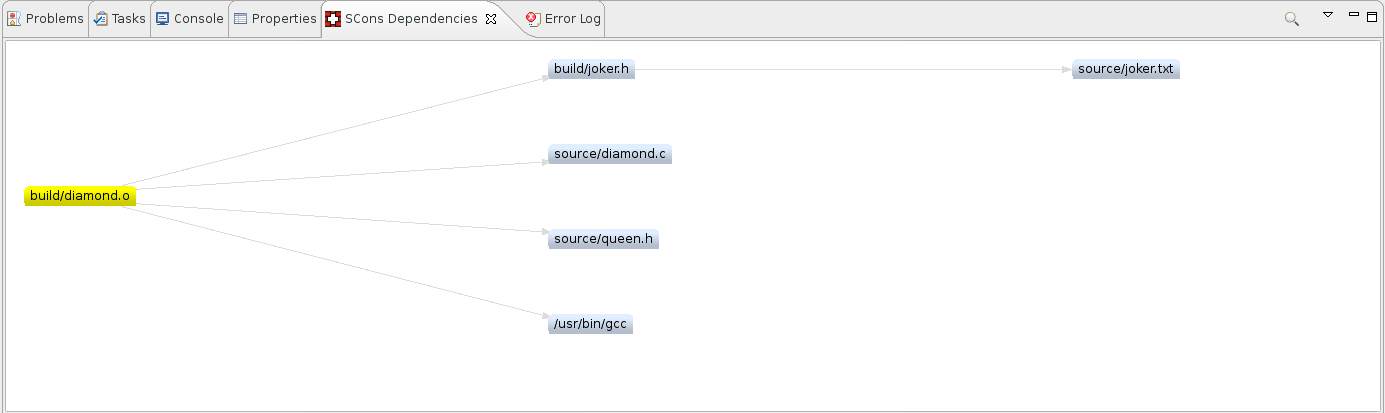
Dependency View
The dependency view visualizes the dependencies of the selected target SCons has emitted. You can choose a target of a SCons project in the workspace with a click on the lookup symbol in the upper right corner. The dependencies are then shown in the graph area.
C/C++ specific support
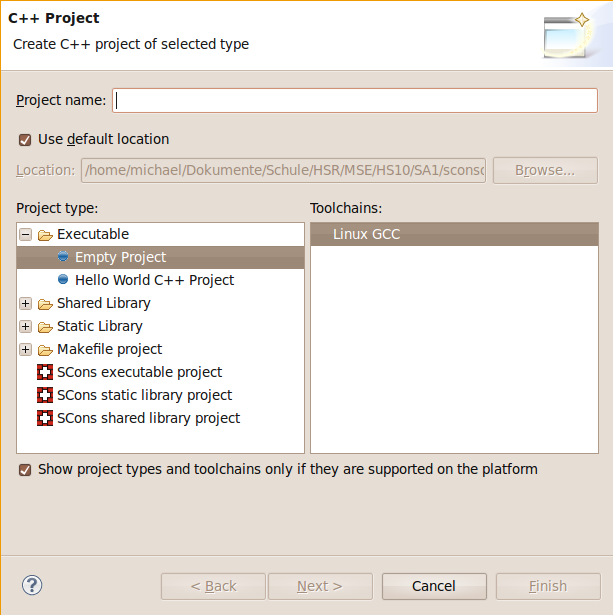
Create new SCons based C/C++ Managed Project
To create a new SCons based project, you can use the New Project wizard of Eclipse and choose C/C++ project. There you can see three new project types for SCons managed projects: executable, shared library and static library project.
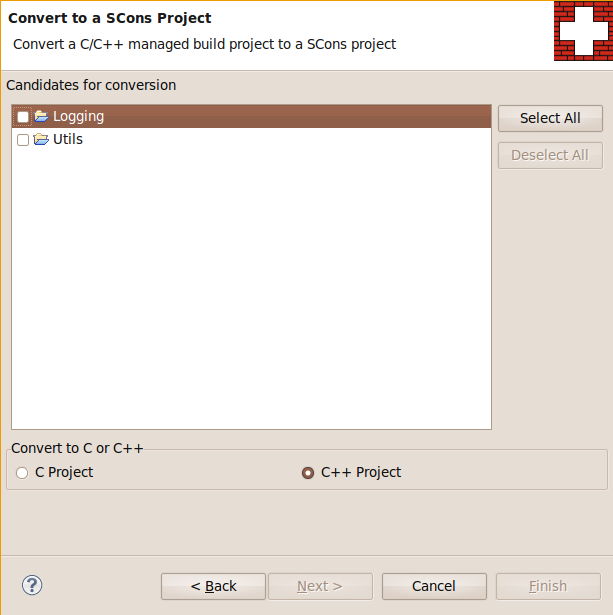
SConsolidator also provides a facility to convert existing managed projects to SCons projects with a context menu on the project level (SCons -> Add SCons support) and with a wizard as shown in this figure.
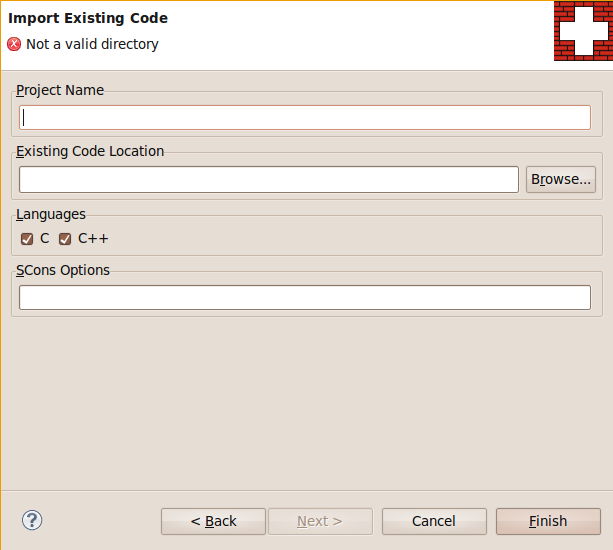
Import of Existing SCons based C/C++ Project
SConsolidator helps you to import existing SCons based C/C++ projects with a wizard. You can choose the location where the code of the existing project is located. If the location contains an Eclipse project, the name of the project is deduced and shown in the corresponding input field. In case you want to set further options for the initial SCons run, you have the possibility to put them in the field SCons options. SConsolidator will then try to gather all include paths and macros of your project necessary for the CDT indexer to properly work and store them in the project settings.
Refresh SConsolidator after altering the SCons build
SConsolidator helps you to keep the build settings of your SCons build consistent with your Eclipse CDT project by (one-way) synchronizing the used include paths and macros. Whenever you changed your SCons build in a way that affects the used include paths or macros, click on the icon with the Switzerland flag in the toolbar or use the project context menu Refresh C/C++ project from SCons of SConsolidator. Both actions run your SCons build and collect all the necessary information for Eclipse CDT to work as expected.
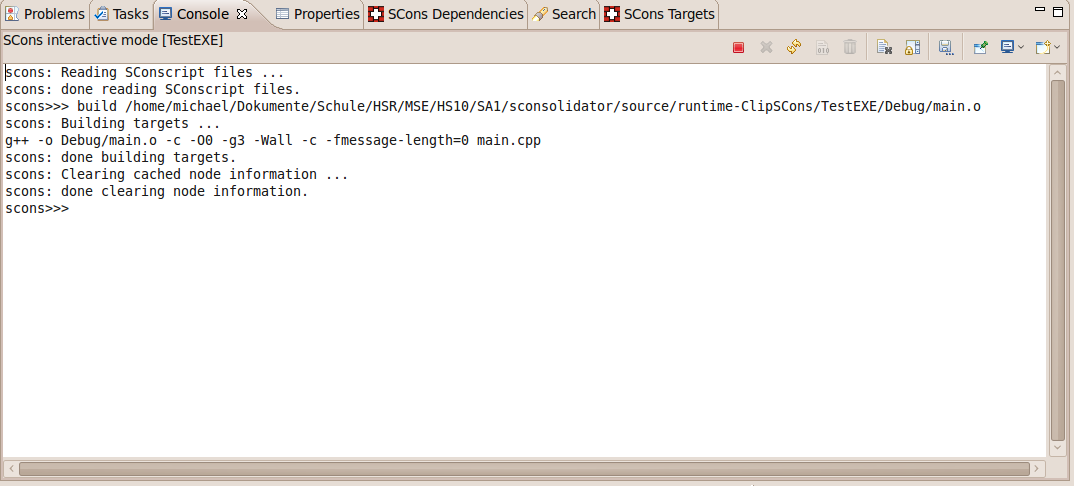
Interactive Console
To build single targets without the need to invoke full builds with every change, we provide an interactive console with SConsolidator where you have all the possibilities known from SCons’ interactive mode. We allow building and cleaning of the corresponding target(s) for the source file currently loaded in the active editor and a redo of the last action as can be seen from the buttons. Of course, you can also type SCons commands in the interactive console directly.
CUTE is part of Cevelop, your number one IDE for safe C++ development